浅入浅出 SpringBoot 集成 Mybatis

最近看李笑来的一本众创书《新生》。迷上里面一个词”重生”(不是穿越剧里面的那个玩意儿), 以及”再生”, “反复重生”。说的是换新行业的重生,学新知识的重生,换新环境的重生,等等诸如此类。大概意思其实就是”Stay hungry, stay foolish”。里面提了几个接地气儿的观点:”复利”, “践行” 和 “主动选择”。所以,自从新公司入职开始,有很多新东西可以学,总体感觉 very excited。SpringBoot + Mybatis 就是其中的基础。算算时间,试用期结束的日子快到了。所以写点东西,也算是对这段时间学习的一个小小的交代。纯属个人编程经验总结,如果有什么不严谨的地方,欢迎评论指正 。


照例解释几个概念 [1]

SpringBoot: Spring 是个在教科书里都已经存在 N 多年的东西了。随着 Convension Over Configureation 这个概念被越来越多的开发者接受并使用。Spring 略显臃肿的配置文件让这个 J2EE 元老级的框架,越发显得捉襟见肘。所以, 顺应MicroServices的潮流,SpringBoot 应运而生。用来构建基于Spring框架的标准化的独立部署应用程序。(“再也tmd不用寄人篱下,活在WebContainer的屋檐下了”)。

Spring Boot简化了基于Spring的应用开发,你只需要”run”就能创建一个独立的,产品级别的Spring应用。 我们为Spring平台及第三方库提供开箱即用的设置,这样你就可以有条不紊地开始。多数Spring Boot应用只需要很少的Spring配置。

Mybatis: 说白了就是操作数据库的。

MyBatis 是支持定制化 SQL、存储过程以及高级映射的优秀的持久层框架。MyBatis 避免了几乎所有的 JDBC 代码和手动设置参数以及获取结果集。MyBatis 可以对配置和原生Map使用简单的 XML 或注解,将接口和 Java 的 POJOs(Plain Old Java Objects,普通的 Java对象)映射成数据库中的记录。

Mybatis - Spring: Mybatis针对Spring的适配版本, 可以用依赖注入的方式调用SqlSession。

MyBatis-Spring 会帮助你将 MyBatis 代码无缝地整合到 Spring 中。 使用这个类库中的类, Spring 将会加载必要的 MyBatis 工厂类和 session 类。 这个类库也提供一个简单的方式来注入 MyBatis 数据映射器和 SqlSession 到业务层的 bean 中。 而且它也会处理事务, 翻译 MyBatis 的异常到 Spring 的 DataAccessException 异常(数据访问异常,译者注)中。最终,它并不会依赖于 MyBatis,Spring 或 MyBatis-Spring 来构建应用程序代码。

话不多说 先看看Demo [2]

源码地址 -> https://github.com/GavinLee1/HelloMybatis.git

项目运行起来之后 浏览器输入 [localhost:8080/swagger-ui.html] 进行访问

本项目,主要实现了以下几个 API :

  • CreateUser
  • GetUserById
  • ListUserByIdList
API list

访问 API 返回的 Response Message 长这个样子:

GetUserById Response

从开发环境开始讲起 [3]

技术环境 [3.1]

  • Framwork: SpringBoot, Mybatis
  • IDE: Intellij
  • Project Manager: Maven
  • Version Control: Git
  • Prgrammong Language: Java

用Intellij 新建一个项目 [3.2]

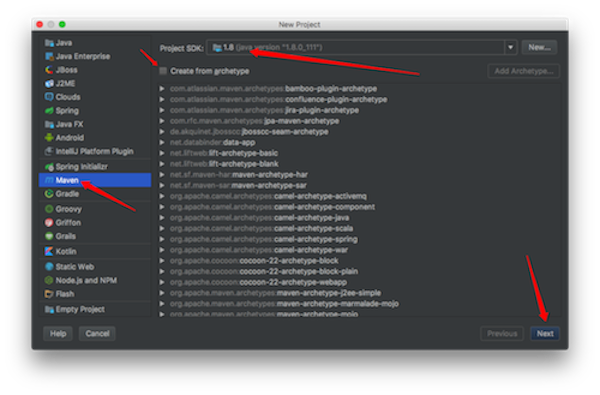
1.直接新建一个空的 maven peoject 就行了
create maven empty project

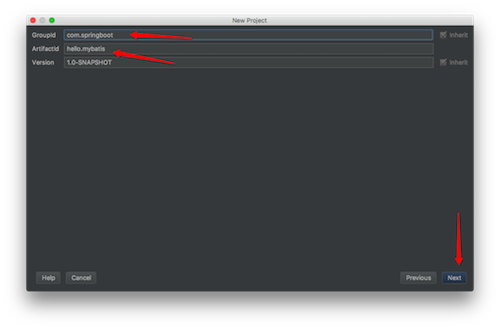
2.填写maven项目的参数
maven argument

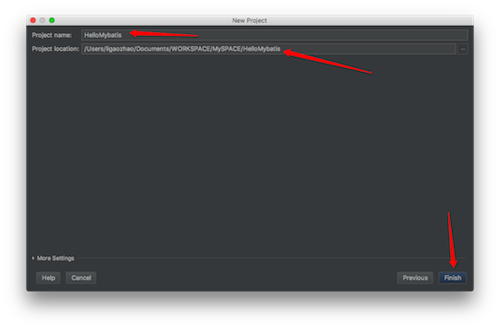
3.给项目取个名字
maven project name

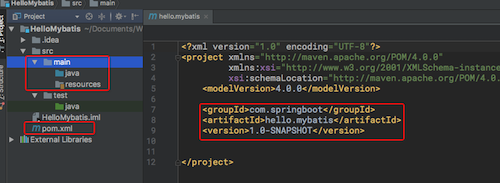
4.以上几步都成功了的话,初始项目的结构大概是这个样子的
empty project structure

需要添加的 Maven Dependencies [3.3]

SpringBoot 相关的 Dependencies

注意添加parent节点

1
2
3
4
5
6
7
8
9
10
11
12
13
14
15
16
17
18
19
20
21
22
23
24
25
26
27
28
29
30
31
32
33
34
35
36
<parent>
<groupId>org.springframework.boot</groupId>
<artifactId>spring-boot-starter-parent</artifactId>
<version>1.3.8.RELEASE</version>
</parent>
<properties>
<spring-boot.version>1.3.8.RELEASE</spring-boot.version>
<spring.context.version>4.2.4.RELEASE</spring.context.version>
</properties>
<dependencies>
<dependency>
<groupId>org.springframework.boot</groupId>
<artifactId>spring-boot-starter</artifactId>
<version>${spring-boot.version}</version>
</dependency>
<dependency>
<groupId>org.springframework.boot</groupId>
<artifactId>spring-boot-starter-web</artifactId>
<version>${spring-boot.version}</version>
</dependency>
<dependency>
<groupId>org.springframework.boot</groupId>
<artifactId>spring-boot-starter-undertow</artifactId>
<version>${spring-boot.version}</version>
</dependency>
<dependency>
<groupId>org.springframework</groupId>
<artifactId>spring-context</artifactId>
<version>${spring.context.version}</version>
</dependency>
</dependencies>

Mybatis 相关的 Dependencies

1
2
3
4
5
6
7
8
9
10
11
12
13
14
15
16
17
18
<properties>
<mybatis.version>3.4.2</mybatis.version>
<mybatis-spring.version>1.3.1</mybatis-spring.version>
</properties>
<dependencies>
<dependency>
<groupId>org.mybatis</groupId>
<artifactId>mybatis</artifactId>
<version>${mybatis.version}</version>
</dependency>
<dependency>
<groupId>org.mybatis</groupId>
<artifactId>mybatis-spring</artifactId>
<version>${mybatis-spring.version}</version>
</dependency>
</dependencies>

数据库连接需要的 Dependencies

1
2
3
4
5
6
7
8
9
10
11
12
13
14
15
16
17
18
<properties>
<spring-jdbc.version>4.3.5.RELEASE</spring-jdbc.version>
<mysql-connector.version>5.1.38</mysql-connector.version>
</properties>
<dependencies>
<dependency>
<groupId>org.springframework</groupId>
<artifactId>spring-jdbc</artifactId>
<version>${spring-jdbc.version}</version>
</dependency>
<dependency>
<groupId>mysql</groupId>
<artifactId>mysql-connector-java</artifactId>
<version>${mysql-connector.version}</version>
</dependency>
</dependencies>

项目结构 [3.4]

根据 MVC 模式的大原则,本项目的结构如下图所示。

  • Controller 接受上层 view 传回的参数,进行处理之后,返回 view 所需要的数据
  • Service 层主要处理核心业务逻辑,比如最常见的 合法性判断业务运算逻辑聚合封装返回值等等
  • Dao 层作为数据的中转站,对各类数据源进行整合。只是整合数据源 不处理业务逻辑
  • 然后就是具体的数据层

这个布局和设计是我个人比较习惯的方式。但是,系统设计从来都是一件仁则见仁,智者见智的事情。所以,最好是能找到一种适合自己风格的方式。

API Project Structure

具体来看 大概是如下的层次结构:

API Intellij Directory Structure

数据库表 [3.5]

建表语句如下

1
2
3
4
5
6
7
8
9
CREATE TABLE `user` (
`id` int(10) NOT NULL AUTO_INCREMENT,
`name` varchar(60) DEFAULT NULL,
`gender` tinyint(4) DEFAULT NULL,
`birthday` datetime DEFAULT NULL,
`email` varchar(60) DEFAULT NULL,
`phone` varchar(20) DEFAULT NULL,
PRIMARY KEY (`id`)
)DEFAULT CHARSET=utf8;


整体上有了个映像之后 我们一步一步拆开看吧


首先 最重要的是 - SpringBoot [4]

先让 SpringBoot飞 [4.1]

1.我一般习惯性在根目录下新建一个叫做Application.java的文件作为启动器

2.然后, 像所以 Java 程序一样,你需要一个 main 函数

3.在 Application 的头上戴个帽子(注解) @SpringBootApplication 这个注解其实等价于 @Configuration + @EnableAutoConfiguration + @ComponentScan。用哪个得根据需求和喜好了,当然还有版本。

4.看起来应该是这个样子:

1
2
3
4
5
6
7
8
9
@ComponentScan(basePackages = {"com.hello.mybatis"})
@Configuration
@EnableAutoConfiguration(exclude={
DataSourceAutoConfiguration.class})
public class Application {
public static void main(String [] args) {
SpringApplication.run(Application.class, args);
}
}

5.然后,amazing的事情发生了: 你的 SpringBoot 项目已经可以启动运行了 - “妈妈再也不用担心 So easy 系列”

我常用的 SpringBoot 注解 [4.2]

SpringBoot 官方文档洋洋洒洒几百页。其实,你只要会 Java,再了解一下这些注解的作用。使用起来也就没啥障碍了。平时需要什么的时候,再查就好了。然后,我平时常用的注解有这么几个:
@Configuration
@Bean
@Value
@Service
@Controller
@Repository
@Inject
@Named

引入外部配置文件 和 配置数据源的 两种方式 [4.3]

其实, 针对外部配置文件, Spring 框架已经帮我们考虑了很多。不过有时候根据项目需要,我们也得手动导入一些配置文件信息。所以,这里特别就这两种方式,进行简单说明。

1.自定义的配置文件根目录(比如示例项目的 /conf 目录)
这个目录位置可以在 pom.xml 文件中进行配置,比如:

1
2
3
4
5
6
7
<build>
<resources>
<resource>
<directory>conf</directory>
</resource>
</resources>
</build>

2.SpringBoot 自动导入配置文件 自动注入数据源
在此根目录下新建一个 application.properties 文件。这个文件里的参数值会被 SpringBoot 自动载入。然后可以在项目中通过注解 @Value 进行访问 例如:

1
2
@Value("${host:127.0.0.1}")
private String HOST;

这里 : 后为未找到该参数项时的默认值。如果不添加默认值,那么,读取不到该参数时,会抛 IllegalArgumentException。载入时,参数类型不匹配也会抛异常。

至于自动载入数据源的问题,大体类似。首先在 pom.xml 里面添加关于 jdbc 和 MySQL connector 的 dependency。然后,在 application.properties 文件中根据 SpringBoot 的命名规范添加相关信息就可以了。完成之后,在项目中,就可以用 @Inject DataSource dataSource 的方式访问这个数据源了。通过这种方式,也可以配置多个数据源。

application.properties中数据源配置信息的命名格式

1
2
3
4
spring.datasource.driver-class-name=com.mysql.jdbc.Driver
spring.datasource.url=jdbc:mysql://localhost:3306/test
spring.datasource.username=root
spring.datasource.password=root

3.手动载入配置文件 并 配置数据源
新建配置文件(比如 jdbc.properties)。然后在项目中,进行手动载入和调用。具体如下:

jdbc.properties

1
2
3
4
5
6
7
dataSourceClassName=com.mysql.jdbc.jdbc2.optional.MysqlDataSource
dataSource.url=jdbc:mysql://localhost:3306/test
dataSource.user=root
dataSource.password=root
dataSource.cachePrepStmts=true
dataSource.prepStmtCacheSize=250
dataSource.prepStmtCacheSqlLimit=2048

配置DataSource
这里推荐一个高性能的 DataSource - HikariDataSource

为了使用这个DataSource,需要添加Dependency:

1
2
3
4
5
<dependency>
<groupId>com.zaxxer</groupId>
<artifactId>HikariCP</artifactId>
<version>2.5.1</version>
</dependency>

数据源配置:

1
2
3
4
5
6
7
8
9
10
11
12
13
14
15
16
17
@Bean(name = "userDataSource")
public DataSource userDataSource() {
HikariDataSource mysqlDS = null;
try {
Resource resource = new ClassPathResource("jdbc.properties");
Properties props = PropertiesLoaderUtils.loadProperties(resource);
HikariConfig config = new HikariConfig(props) {
};
mysqlDS = new HikariDataSource(config);
log.info("[Mybatis] - Database connection pool created!");
} catch (IOException e) {
log.error("[Mybatis] - Error connecting data source", e);
}
return mysqlDS;
}

Mybatis 必知必会 [5]

通过Mapper访问数据库 [5.1]

这里有两层意思:
a) 具体的sql都写在mapper中
b)上层需要获得mapper去访问数据库

sql写在哪儿? [5.2]

a) 可以写在定义mapper的interface 中
b) 可以写在 *Mapper.xml中
这里使用第二种方法,个人感觉写在 xml 文件中,能更加方便的使用mybatis的 动态sql 特性

SqlSession [5.3]

我们需要SqlSession去打开一个会话。之后,你可以使用它来执行映射语句,提交或回滚连接,最后,当不再需要它的时候, 你可以关闭session。 使用 MyBatis-Spring 之后, 你的 bean 可以通过一个线程安全的 SqlSession 来注入,基于 Spring 的事务配置 来自动提交,回滚,关闭 session。 不再需要手动关闭SqlSession

SqlSessionTemplate [5.4]

为了获得SqlSession。我们需要SqlSessionTemplate。SqlSessionTemplate 是 MyBatis-Spring 的核心。 这个类负责管理 MyBatis 的 SqlSession, 调用 MyBatis 的 SQL 方法, 翻译异常。 SqlSessionTemplate 是线程安全的, 可以被多个 DAO 所共享使用。当调用 SQL 方法时, 包含从映射器 getMapper()方法返回的方法, SqlSessionTemplate 将会保证使用的 SqlSession 是和当前 Spring 的事务相关的。此外,它管理 session 的生命 周期,包含必要的关闭,提交或回滚操作。

1
2
3
4
5
@Bean(name = "userSqlSessionTemplate")
public SqlSessionTemplate ringsAccountSqlSessionTemplate(@Named("userSqlSessionFactory") SqlSessionFactory sqlSessionFactory) {
log.info("[Mybatis] - Loaded the SqlSessionTemplate with name userSqlSessionTemplate!");
return new SqlSessionTemplate(sqlSessionFactory);
}

SqlSessionFactory [5.5]

为了获得SqlSessionTemplate。我们需要SqlSessionFactory。为了获得SqlSessionFactory。我们需要一个DataSource。DataSource的注入方法,在前面已经阐述过了,此处就不在赘述。

1
2
3
4
5
6
7
8
9
10
11
12
13
14
15
16
17
@Bean(name = "userSqlSessionFactory")
public SqlSessionFactory userSqlSessionFactory() throws Exception {
SqlSessionFactoryBean sqlSessionFactoryBean = new SqlSessionFactoryBean();
sqlSessionFactoryBean.setDataSource(userDataSource());
sqlSessionFactoryBean.setTypeAliasesPackage("com.hello.mybatis.repository.domain");
ResourcePatternResolver resolver = new PathMatchingResourcePatternResolver();
sqlSessionFactoryBean.setMapperLocations(resolver.getResources("classpath:mybatis/*Mapper.xml"));
log.info("[Mybatis] - Loaded the userSqlSessionFactory!");
return (SqlSessionFactory) sqlSessionFactoryBean.getObject();
}


请注意他们的依赖次序 mapper -> SqlSession -> SqlSessionTemplate -> SqlSessionFactory -> DataSource


准备工作完毕之后 [haha] [6]

定义 POJO 模型 [6.1]

毕竟示例程序,越简单越好。这里就整个最普通的 User 模型。考虑到篇幅,getter, setter 和 constructer 我没贴出来。感兴趣的可以直接去看源码。User 里的 id 作为唯一标识这个对象的 自增 主键。

1
2
3
4
5
6
7
8
public class User {
private Integer id;
private String name;
private int gender;
private Timestamp birthday;
private String email;
private String phone;
}

UserMapper.xml 里面有些什么 [6.2]

1.先贴代码:

1
2
3
4
5
6
7
8
9
10
11
12
13
14
15
16
17
18
19
20
21
22
23
24
25
26
27
28
29
30
31
32
33
34
35
36
37
38
39
40
41
42
43
44
45
46
<?xml version="1.0" encoding="UTF-8" ?>
<!DOCTYPE mapper PUBLIC "-//mybatis.org//DTD Mapper 3.0//EN" "http://mybatis.org/dtd/mybatis-3-mapper.dtd">
<mapper namespace="com.hello.mybatis.repository.mybatis.mapper.UserMapper">
<resultMap id="userResultMap" type="com.hello.mybatis.repository.pojo.User">
<id property="id" column="id" javaType="java.lang.Integer" jdbcType="INTEGER"/>
<result property="name" column="name"/>
<result property="gender" column="gender"/>
<result property="birthday" column="birthday"/>
<result property="email" column="email"/>
<result property="phone" column="phone"/>
</resultMap>
<insert id="createUser" parameterType="com.hello.mybatis.repository.pojo.User" useGeneratedKeys="true"
keyProperty="id">
INSERT INTO user (
name,
gender,
birthday,
email,
phone
)
VALUES
(
#{name},
#{gender},
#{birthday},
#{email},
#{phone}
);
</insert>
<select id="selectUserById" parameterType="int" resultMap="userResultMap">
SELECT * FROM user WHERE id=#{id}
</select>
<select id="listUserByIdList" resultMap="userResultMap">
SELECT * FROM user WHERE id IN
<foreach item="item" index="index" collection="list"
open="(" separator="," close=")">
#{item}
</foreach>
</select>
</mapper>

2.namespace 指向定义的 mapper 。这个是重点,也是很容易踩进去的坑。要特别注意。另外一点就是,mapper接口里是可以直接定义 sql 的,具体请 Google。

3.resultMap 定义的是数据库表和模型对象之间的映射关系。mybatis会根据 resultMap 里的定义进行字段和对象属性之间的映射和转换。这里的 type 指向自定义的模型对象。

4.insert标签里的 useGeneratedKeys="true" keyProperty="id" 会返回生成的自增主键值。 #{} 操作符用来获取对象相应属性的值。

5.parameterType 是传入数据的类型。

6.foreach 标签会遍历传入的 list。如果传入的 parameterTypemap ,这里的 collection 可为自定义的 list 名称。

UserMapper 接口 [6.3]

这个接口起着承上启下的作用。里面可以直接定义 sql 语句。如果不在此接口内的方法上方定义 sql,那么里面的方法名,参数列表,返回值必须与 *Mapper.xml 里面各种 sql标签一致。sql 标签的 id 值即为方法名。

1
2
3
4
5
public interface UserMapper {
int createUser(final User user);
User selectUserById(final int id);
List<User> listUserByIdList(final Collection<Integer> idList);
}

MybatisRepository 的实现类 [6.4]

同样,考虑到篇幅的问题,这里只列举了一个方法作为示范,具体请查看源代码。这个类里请注意这几点:

  • 注入 SqlSession
  • 通过 SqlSession 获取 UserMapper
  • 用 Mapper 来访问数据库
1
2
3
4
5
6
7
8
9
10
11
12
13
14
15
16
17
18
19
20
21
22
23
24
25
26
@Repository
public class UserMybatisRepositoryImpl implements UserMabatisRepository {
@Inject
private SqlSession sqlSession;
private final static Logger log = LoggerFactory.getLogger(UserMybatisRepositoryImpl.class);
private UserMapper getMapper() {
return this.sqlSession.getMapper(UserMapper.class);
}
@Override
public int createUser(User user) throws DatabaseException {
int result = getMapper().createUser(user);
if (result <= 0) {
log.error("[createUser] - Fail to create user[{}]", user.toString());
throw new DatabaseException("[createUser] - Fail to create user: " + user.toString());
}
return 0;
}
}

Service 方法 [6.5]

因为这个项目逻辑相对简单,所以 Service 中并未出现很多业务处理的操作。只是简单的判断了下 Request对象,对 Response进行了封装。更多的只是从注入的 MybatisRepository 直接访问数据库。

1
2
3
4
5
6
7
8
9
10
11
12
13
14
15
16
17
18
19
20
21
22
23
24
@Service
public class UserServiceImpl implements UserService {
@Inject
private UserMabatisRepository userMabatisRepository;
@Override
public BaseResp createUser(CreateUserReq req) {
if (req == null) {
return new BaseResp(false, "Null Request!");
}
User user = new User(req.getName(), req.getGender(), req.getBirthday(), req.getEmail(), req.getPhone());
try {
userMabatisRepository.createUser(user);
} catch (DatabaseException e) {
return new BaseResp(false, e.toString());
}
return new BaseResp(true, "OK");
}
}

简单粗暴的 Controller [6.6]

1
2
3
4
5
6
7
8
9
10
11
12
13
14
@Controller
@RequestMapping("/user")
public class UserController {
@Inject
private UserService userService;
@ResponseBody
@RequestMapping(value = "/create-user", method = RequestMethod.POST, produces = "application/json;charset=UTF-8")
public BaseResp createUser(@RequestBody CreateUserReq req) {
return userService.createUser(req);
}
}

写在最后

再一次:
源码地址 -> https://github.com/GavinLee1/HelloMybatis.git

References

[1] GitBook - SpringBoot参考指南 Spring-Boot-Reference-Guide
[2] What’s Mybatis
[3] Mybatis - Spring

坚持原创技术分享,您的支持将鼓励我继续创作!